Creating a Valheim Server
1-3 players ok anything more it will struggle.
OCI Always Free gives you:
- ARM Ampere A1 compute
- Up to:
- 2 OCPUs
- 12 GB RAM total
- Completely free if configured correctly
That ARM capacity is the reason OCI is one of the few clouds where free Valheim hosting is actually viable.
Step 1: Create a Free Tier Virtual Machine
First, log into:
OCI Console → Compute → Instances → Create Instance
Use these settings:
Image
Canonical Ubuntu 22.04 Minimal aarch64
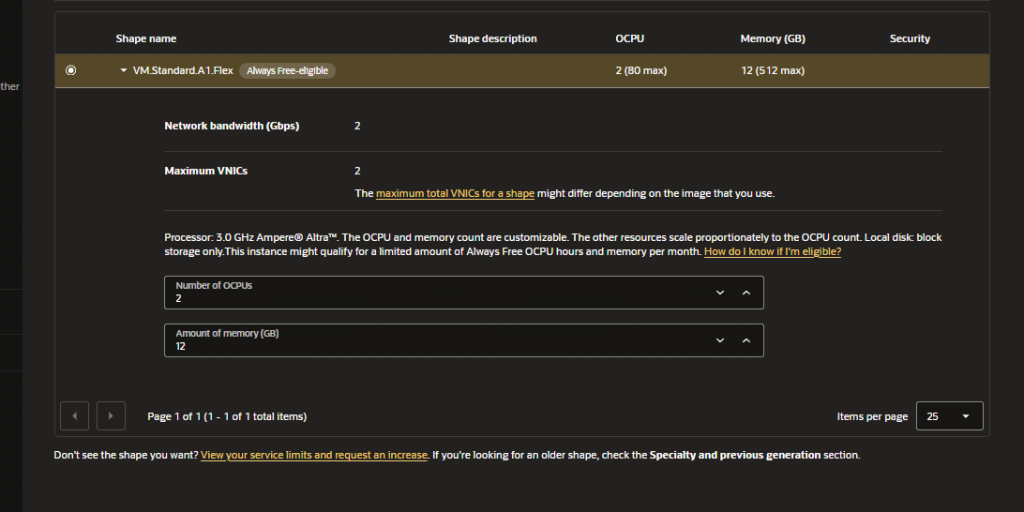
Shape
Ampere: VM.Standard.A1.Flex (Always Free)
- OCPUs: 2
- Memory: 12 GB
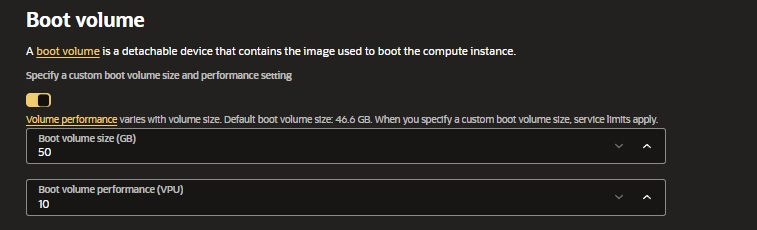
- Boot Volume: 50 GB
- Public IP: Yes
Once created, OCI gives you:
- Public IP address
- SSH private key
Save that key somewhere safe.
Leave the rest of the settings as default
For Network set up see: https://jenthomson.co.uk/blog/setting-up-networks/
Step 2: Covert your Private SSH Key (Windows)
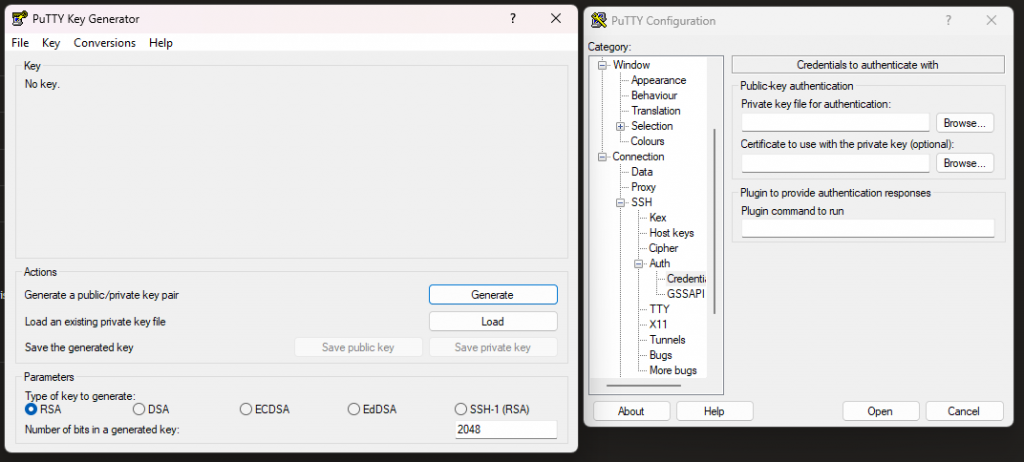
In PuTTY Key Generator
Click ‘Load’ and select your .key SSH file (change to all files to be able to see it), give it a password and then click ‘Save private key’
Then go into PuTTY Configuration and type in ubuntu@<your-public-ip> and port 22 then navigate on the left hand side down to SSH > Auth > Credentials > Then load in the .ppk file you generated in the previous step
You should now be connected and you will get an alert just click ‘Accept’ and then enter the user ‘ubuntu’ and the password phrase you set in PuTTY Gen.
If you have trouble connecting then make sure your IP Address is set up as an ingress rule see blog page Networking Basics for help on this.
Step 3: Install Docker and Prepare the Host
Update Ubuntu and install Docker:
sudo apt update
sudo apt upgrade -y
sudo apt install -y docker.io docker-compose nano
Enable Docker so it starts automatically after a reboot:
sudo systemctl enable docker
sudo systemctl start docker
Allow your user account to run Docker commands without needing sudo:
sudo usermod -aG docker $USERLog out and back in (or reconnect via SSH) for the group membership change to take effect.
Then check Docker and Composer is installed
docker --version
docker-compose --version
Step 4: Create a Directory for Valheim
Create a folder to hold the server data:
mkdir -p ~/valheimCreate a folder to hold the server data:
cd ~/valheimVerify Your Location
Check that you are in the correct folder:
pwdYou should see:
/home/ubuntu/valheimStep 5: Create the Docker Compose File
Create the Compose file:
nano docker-compose.ymlPaste this in:
services:
  valheim_box64:
    image: ghcr.io/gornius/valheim_box64:latest
    container_name: valheim-server
    restart: unless-stopped
    ports:
      - "2456:2456/udp"
      - "2457:2457/udp"
      - "2458:2458/tcp"
    environment:
      - VALHEIM_SERVER_NAME=My Valheim Server
      - VALHEIM_WORLD_NAME=Dedicated
      - VALHEIM_PASSWORD=ChangeMe123
      - VALHEIM_ISPUBLIC=1
    volumes:
      - "./server_files/:/root/server_files"
      - "./server_data/:/root/.config/unity3d/IronGate/Valheim/"
Save:
CTRL + O
Enter
CTRL + X
You can check the file has saved by entering ‘cat -n docker-compose.yml’
Then Start the Server:
docker compose up -dIf that doesn’t work try the old syntax (docker-compose up -d)
Then check status and view logs:
docker ps -a
docker logs valheim-server
Step 6: Configure OCI Firewall Rules
OCI blocks traffic by default.
Navigate to:
Networking > Virtual Cloud Networks > Your VCN > Security Lists
Create the following ingress rules:
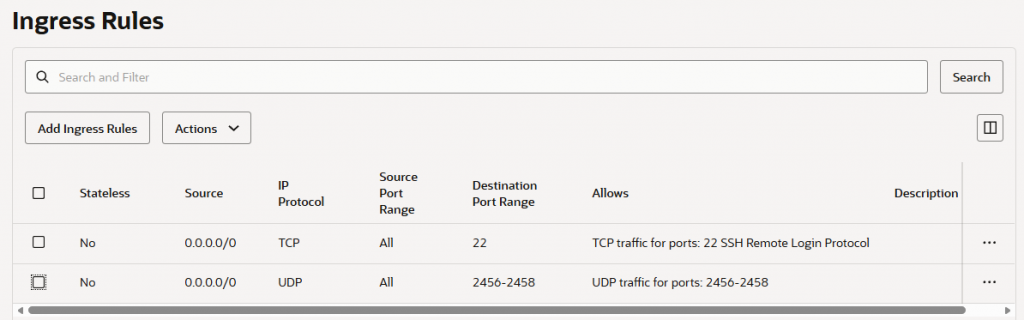
Keeping SSH restricted to your own IP address is strongly recommended.
Step 7: Open the Ubuntu Firewall
Check whether UFW is enabled:
sudo ufw statusIf it is enabled:
sudo ufw allow 2456/udp
sudo ufw allow 2457/udp
sudo ufw allow 2458/tcp
sudo ufw allow 22/tcp
sudo ufw reload
If it isn’t installed run ‘sudo apt install ufw -y’
Step 8: Connect to the Server
Once the logs have completed it should take around 5 minutes, use ctrl C to exit the log in putty. You can close down the instance connection now, but make sure to keep the details so that you back perform backups load in new worlds or install any update (I will try and write more on this soon).
launch Valheim:
Select: Join Game>Add Server
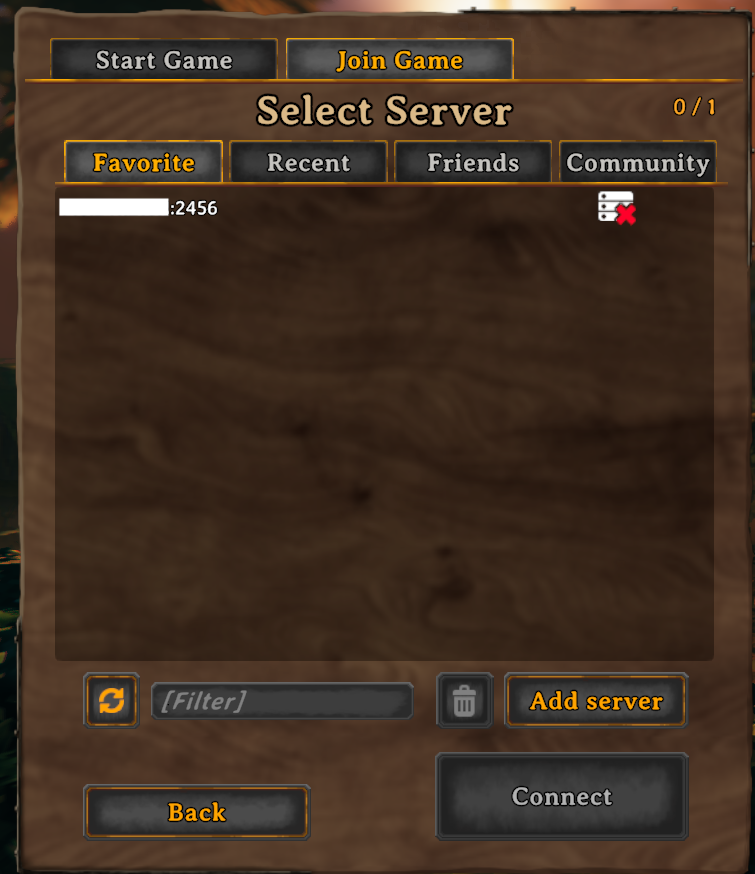
Enter your IP address with :2456> Select Add Server > Connect
Enter the password you set
Monitoring the Server – Useful Commands
Check the server status:
docker psView logs:
docker logs -f valheim-serverRestart the server:
docker restart valheim-serverStop the server:
docker stop valheim-serverPerformance Expectations
This configuration works surprisingly well for small groups.
Recommended:
- 1–3 players: Excellent
- 4–6 players: Playable
- 7+ players: Expect lag and world-save delays
Valheim’s networking model is peer-to-peer heavy, so server performance is not the only limiting factor.
Final Thoughts
Oracle Cloud’s ARM-based Always Free tier is one of the few genuinely free options capable of hosting a persistent Valheim world.
For a small group of friends, it provides enough CPU, memory and storage to run continuously without any monthly hosting costs.
Just remember:
- Restrict SSH access
- Use a strong server password
- Back up your world regularly
- Monitor OCI resources to ensure you remain within Always Free limits
Enjoy your Viking adventures and a huge thank you to Gornius for creating and maintaining the Box64 Valheim container that made this ARM-based OCI deployment possible. Without this work, running a Valheim dedicated server on Oracle Cloud’s Ampere Always Free infrastructure would be significantly more difficult.